MFC 25th Birthday Makeover (Part 4)

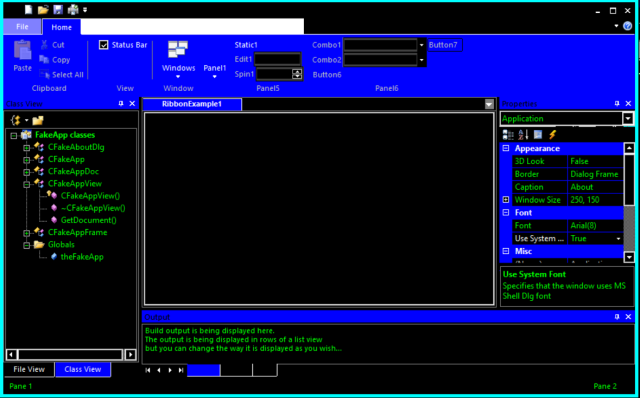
In this 4th installment of giving MFC a Windows 10 makeover, I want to focus on some of the little things that make an application look like its Windows 10, some of the items are going to seem picky but its more about attention to detail.
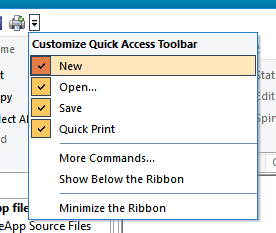
Quick Access Icons

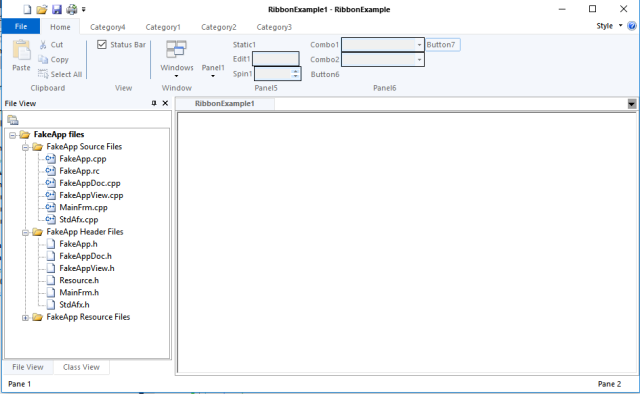
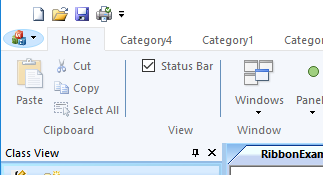
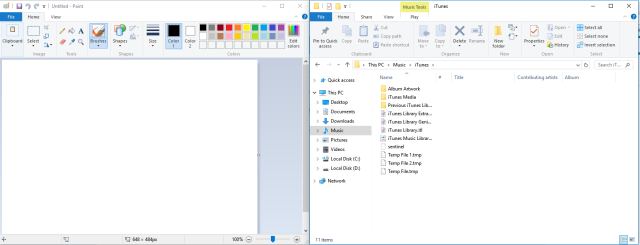
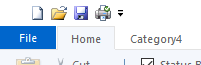
The first difference is the QuickAccess menu icons

Screenshot_47

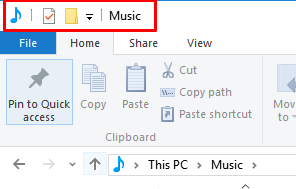
Of course the wizard generated app gives you icons from the 90’s

Screenshot_52

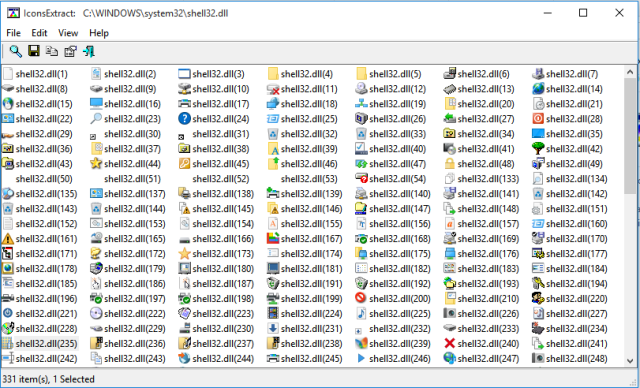
Make sure your app has Windows 10 looking icons, these icons are part of your applications resources (filesmall.bmp) in the wizard generate example project, so you’ll want to edit those.  For Windows 10 these icons tend to come from the shell32.dll, use a tool like IconsExtract  to get the Windows 10 looking icons you need. (if course you need to be aware of copyright issues when grabbing icons)

The icons should have a transparent background, I find this easier if I convert them to png using Paint.NET then make them transparent (wand tool + Ctrl-X), you can just as easily add a PNG resource to your project as a windows BMP
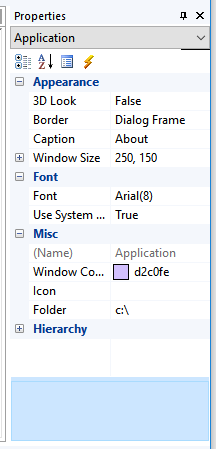
Screenshot_53

Colors

While we are on the topic of colors, there is one little issue that I have noticed that is annoying me.

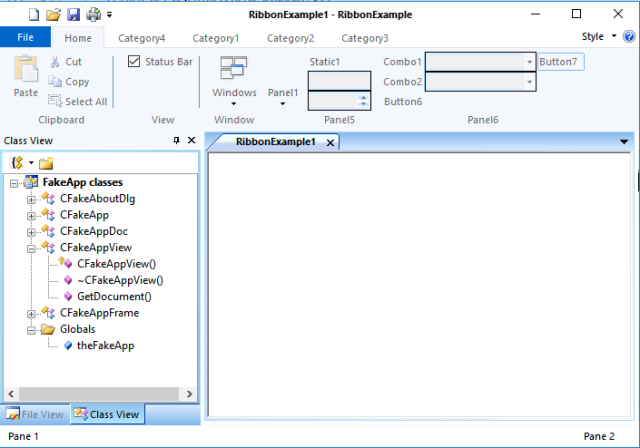
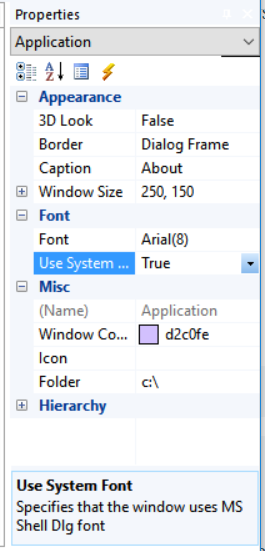
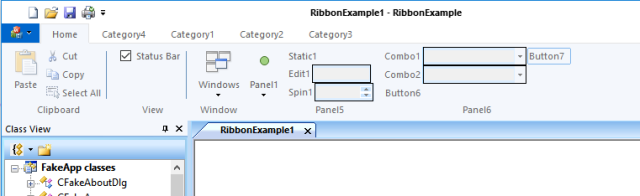
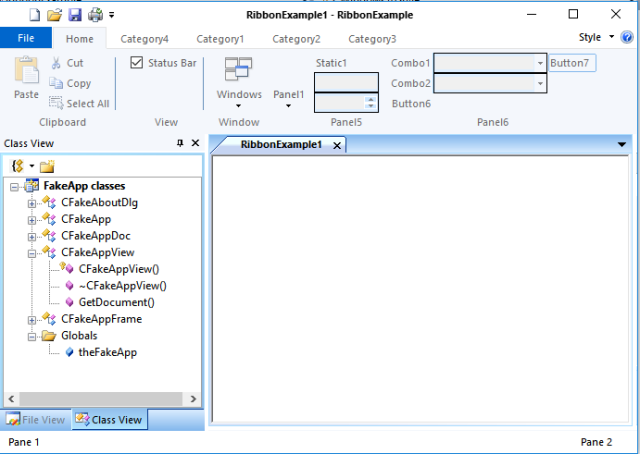
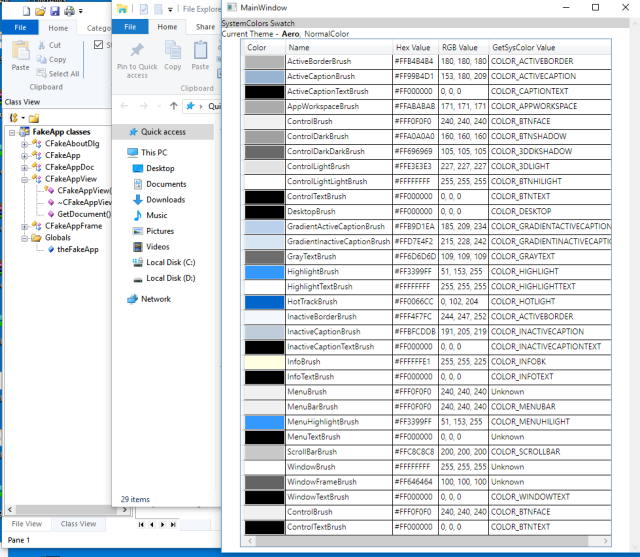
That is the fact that the colors Windows 10 uses for the ribbon is infact NOT a standard sys color type. The actual color (on my system) is #F5F6F7 which as you can see from the swatch is not on the list of colors enumerated by GetSysColor(),

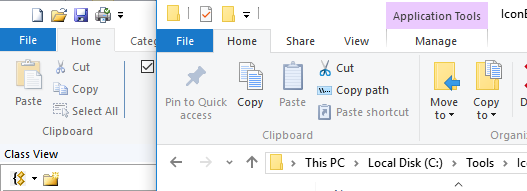
I also noticed  that the File button (ApplicationButton) menu color is not quite  the blue of HotTrackBrush either but itstead it is #1979CA, while this is very minor you can see the difference

Screenshot_49

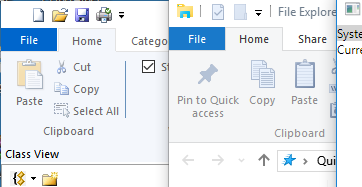
It  becomes very clear when you look at the 2 ribbons up close

Screenshot_50

So in our CWindows10Style class we’ll define 2 new colorref variables

COLORREF    m_clrWindows10Bar;
COLORREF    m_clrWindows10ApplicationButton;

And initialize them in the OnUpdateSystemColors call

// Windows 10 ribbon color
m_clrWindows10Bar = RGB(0xF5, 0xF6, 0xF7);
 
// Windows 10 file menu application button color
m_clrWindows10ApplicationButton = RGB(0x19,0x79,0xCA);

Where we had been drawing the ribbon background with

CBrush brush(GetSysColor(COLOR_INACTIVEBORDER));
pDC->FillRect(rectCategory, &brush);

We’ll now change this code to be

pDC->FillSolidRect(rectCategory, m_clrWindows10Bar);

This will help reduce all the brushes being created, we can handle the Bar color needing to be something else (say due to high contrast) in the OnUpdateSystemColors()

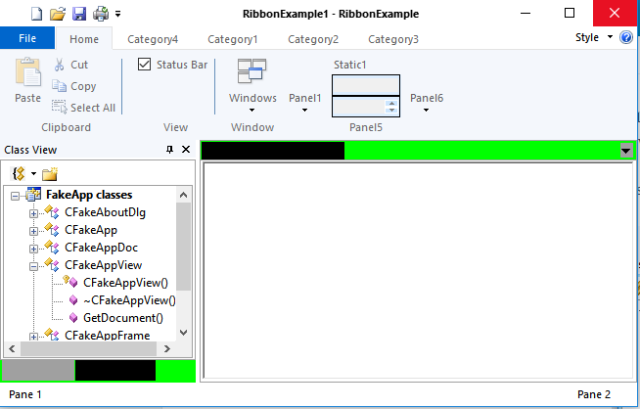
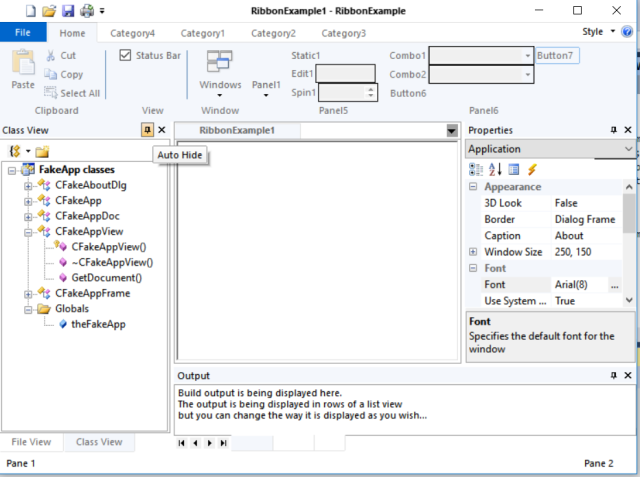
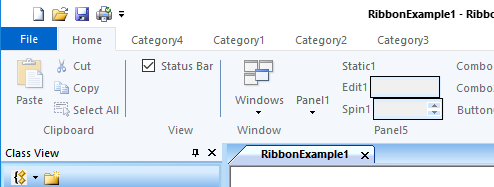
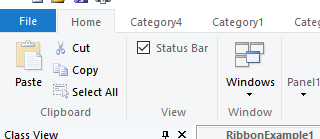
This subtle change has the effect of making the ribbons more similar.

Screenshot_54

Ribbon Pane Separators

The more observant among you will notice that Windows 10 puts in a separator between each Category Panel, I’d simulated this in the ribbon resource by adding a separator, but this is far from idea as the separator height does not go down into the Category Panel label area

Screenshot_83

By making the following modifications to the earlier code, this will be drawn

// this is the caption at the bottom on each panel
    virtual void OnDrawRibbonPanelCaption(
        CDC* pDC,
        CMFCRibbonPanel* pPanel,
        CRect rectCaption)
    {
        pDC->FillSolidRect(rectCaption, m_clrWindows10Bar);
 
        CString str = pPanel->GetName();
 
        if (!str.IsEmpty())
        {
            rectCaption.DeflateRect(1, 1);
 
            if ((rectCaption.Width() % 2) == 0)
            {
                rectCaption.right--;
            }
 
            rectCaption.OffsetRect(0, -1);
 
            COLORREF clrTextOld = pDC->SetTextColor(GetSysColor(COLOR_GRAYTEXT));
            pDC->DrawText(str, rectCaption, DT_SINGLELINE | DT_CENTER | DT_VCENTER | DT_END_ELLIPSIS | DT_NOPREFIX);
            pDC->SetTextColor(clrTextOld);
        }
 
        // draw the separator on the right hand side
        CPen pen(PS_SOLID, 1, GetSysColor(COLOR_3DLIGHT));
        pDC->SelectObject(pen);
        CRect panelRect = pPanel->GetRect();
        pDC->MoveTo(panelRect.right - 1, panelRect.top + 2);
        pDC->LineTo(panelRect.right - 1, panelRect.bottom - 2);
    }

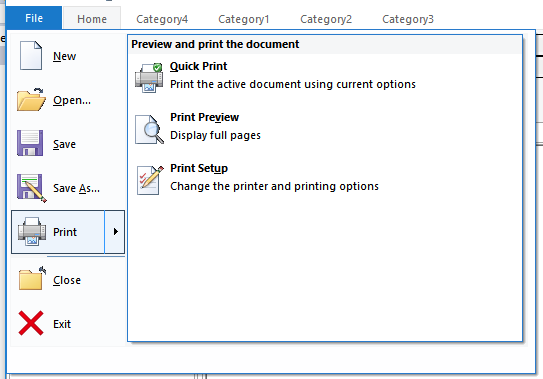
The result is more consistent

 Screenshot_88

File Menu

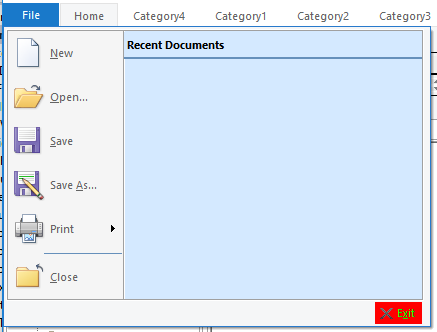
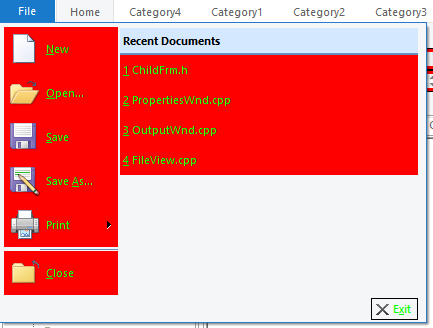
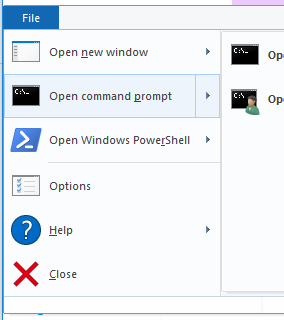
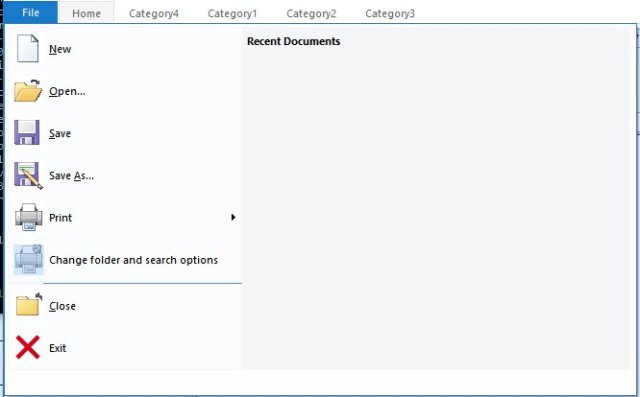
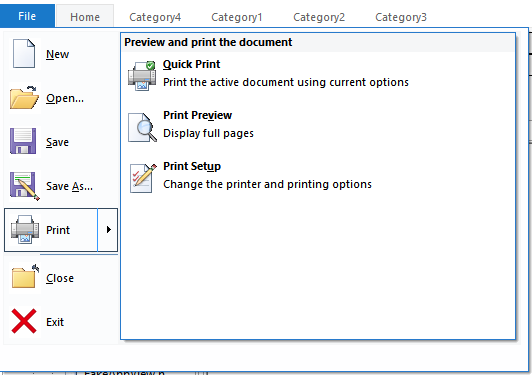
The next area where our example application greatly differs is in the menu that the “File” menu button (MainApplicationButton drops down)

Screenshot_48

This is an area which we need to focus on because we have more blue here, which we obviously have not removed, the yellow exit is left over from an experiment where we were unsure of the usage of one of the colors

Screenshot_51

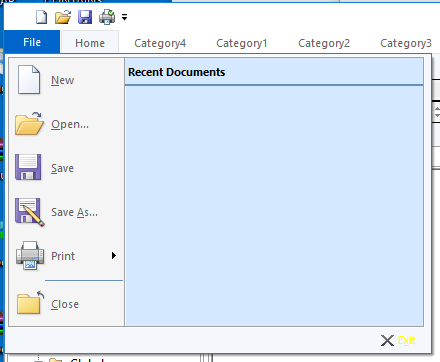
This is controlled by  the OnFillRibbonMainPanelButton call, setting the color brightly we can determine which areas we are drawing

virtual COLORREF OnFillRibbonMainPanelButton(
        CDC* pDC,
        CMFCRibbonButton* pButton)
    {
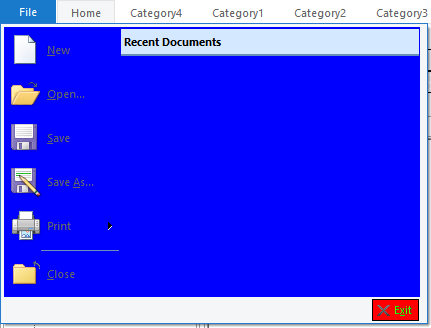
        pDC->FillSolidRect(pButton->GetRect(), RGB(0xFF,0,0));
        return RGB(0x00, 0xFF, 00);
    }

Screenshot_55

By overriding more of the VisualManagers MainPanel calls

virtual void OnDrawRibbonMainPanelButtonBorder(
        CDC* pDC,
        CMFCRibbonButton* pButton
    )
    {
        pDC->SelectStockObject(BLACK_PEN);
        pDC->SelectStockObject(NULL_BRUSH);
        pDC->Rectangle(pButton->GetRect());
    }
 
    virtual void OnDrawRibbonMainPanelFrame(
        CDC* pDC,
        CMFCRibbonMainPanel* pPanel,
        CRect rect
    )
    {
        pDC->FillSolidRect(rect, RGB(0, 0, 0xFF));
    }

We can see how the other areas are drawn

Screenshot_56

For the Windows 10 this area is defined as two separate colors

Image5

The right hand side is our m_clrWindows10Bar color so lets use this for now, the LHS is #FBFCFD

virtual void OnDrawRibbonMainPanelFrame(
        CDC* pDC,
        CMFCRibbonMainPanel* pPanel,
        CRect rect
    )
    {
        pDC->FillSolidRect(rect, m_clrWindows10Bar);
    }

Adding this gives us a single color

Screenshot_59

The frame part really does the border

virtual void OnFillRibbonMenuFrame(
        CDC* pDC,
        CMFCRibbonMainPanel* pPanel,
        CRect rect)
    {
        pDC->FillSolidRect(pPanel->GetRect(), RGB(0xFF, 0x00, 0x00));
    }

Screenshot_66

There is very little frame in the Windows 10 version (especially at the sides) and the color is

Screenshot_67

While its very subtle, the is a very faint color difference between the 3 sections

Image7

But to get a dual color for the left and RHS we’ll have to change a more fundamental call

virtual COLORREF OnFillRibbonButton(
        CDC* pDC,
        CMFCRibbonButton* pButton)
    {
        pDC->FillSolidRect(pButton->GetRect(), RGB(0xFF, 0, 0));
        return RGB(0x00, 0xFF, 0x00);
    }

This call is used to draw the buttons, but not just on the menu

Screenshot_57

We can override this call but it will effect everywhere

Screenshot_58

But it has almost the desired effect in the menu

Screenshot_60

However the ribbonbar buttons  and tabs now look odd with a lighter background

Screenshot_61

We can control this, by only drawing the ligther color when the button is on the main panel

virtual COLORREF OnFillRibbonButton(
        CDC* pDC,
        CMFCRibbonButton* pButton)
    {
        if (pButton->GetParentPanel() && 
            pButton->GetParentPanel()->IsKindOf(RUNTIME_CLASS(CMFCRibbonMainPanel)))
        {
            // #FBFCFD
            pDC->FillSolidRect(pButton->GetRect(), RGB(0xFB, 0xFC, 0xFD));
            return GetSysColor(COLOR_WINDOWTEXT);
        }
        return GetSysColor(COLOR_WINDOWTEXT);
    }

The blue “Recent Documents” Label was a little harder to determine, but ultimately this ends up being a MenuLabel which we hadn’t yet overridden  via the OnDrawMenuLabel call

virtual COLORREF OnDrawMenuLabel(
        CDC* pDC,
        CRect rect)
    {
        pDC->FillSolidRect(rect, m_clrWindows10Bar);
        return GetSysColor(COLOR_WINDOWTEXT);
    }

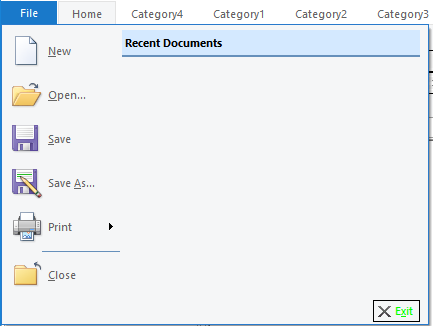
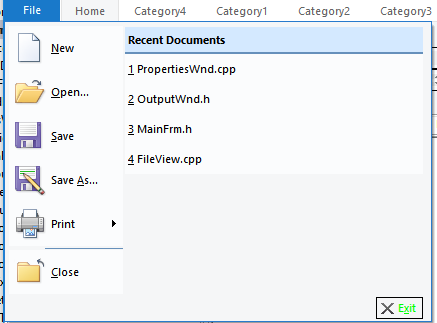
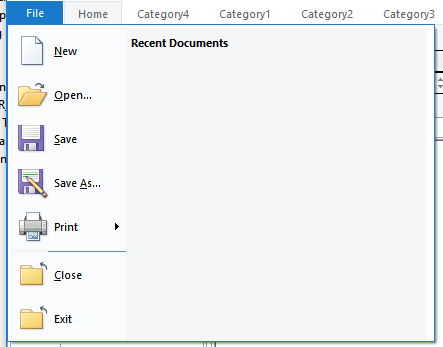
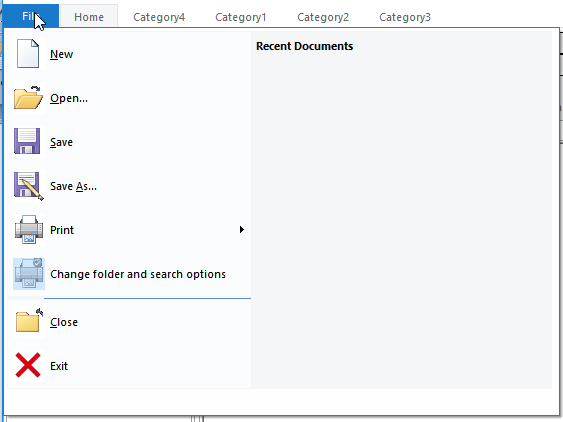
The result looks closer

Screenshot_62

but Now the RHS buttons are incorrect, this can be prevented by altering the code a little, if we assume the RHS won’t have large icons then we can show the menu on the RHS in the barcolor and only the LHS has the lighter color (this assumption will come back to bite us later!)

virtual COLORREF OnFillRibbonButton(
        CDC* pDC,
        CMFCRibbonButton* pButton)
    {
        if (pButton->GetParentPanel() && pButton->GetParentPanel()->IsKindOf(RUNTIME_CLASS(CMFCRibbonMainPanel)))
        {
            // RHS of recent files does not have large icons
            if (pButton->IsLargeImage()) {
                pDC->FillSolidRect(pButton->GetRect(), RGB(0xFB, 0xFC, 0xFD));
                return GetSysColor(COLOR_WINDOWTEXT);
            }
        }
        return GetSysColor(COLOR_WINDOWTEXT);
    }

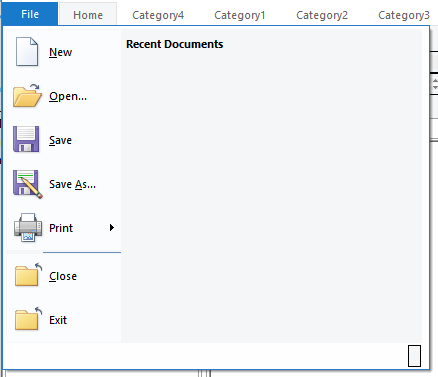
To be honest I’m still not happy with the way the menu looks

Screenshot_64

In relation to how it looks in windows 10, partially that is due to the icons which we can address but also its about the size of the LHS to the RHS and the background not drawing

Screenshot_65

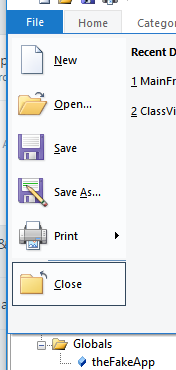
To get the menus to look more like Windows 10, we go back to the Ribbon designer in visual studio

You right click on the Buttons menu, and remove the Exit button from the bottom of the menu

Screenshot_69

Screenshot_70

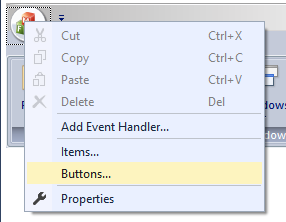
Then going back to the design right click the Items menu

Screenshot_71

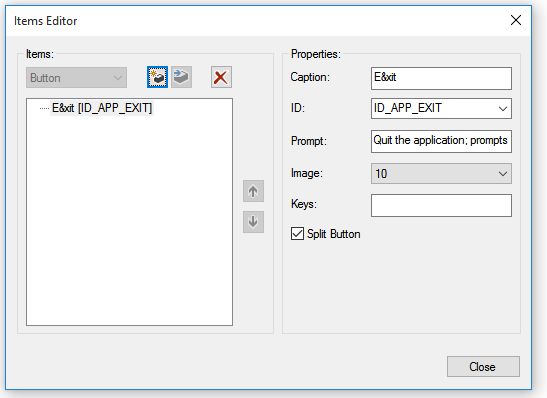
And add the exit menu there

Screenshot_72

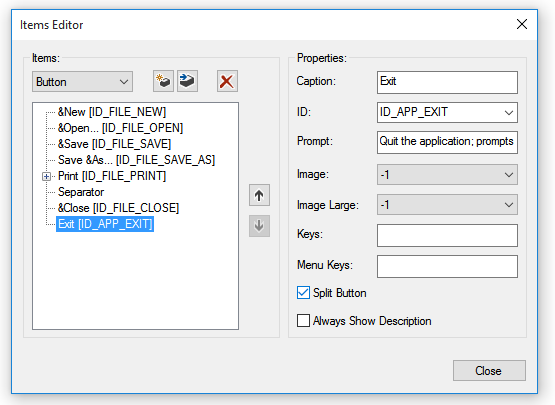
This moves the exit button (excuse the icon) onto the menu itself , however this removes the white border that was at the bottom of the Windows 10 menu

Screenshot_73

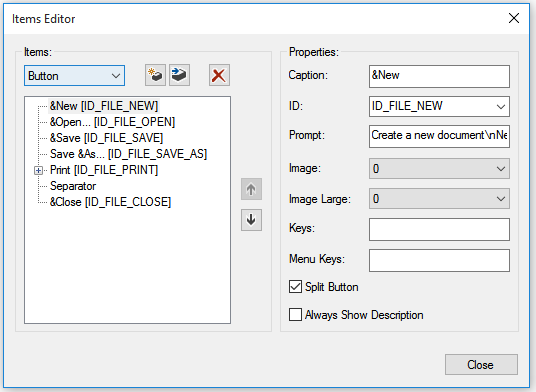
Then go back to the Buttons option and add an empty button.

Screenshot_74

Now we change our drawing code to remove the button drawing when the text is empty,

virtual void OnDrawRibbonMainPanelButtonBorder(
        CDC* pDC,
        CMFCRibbonButton* pButton
    )
    {
        CString text = pButton->GetText();
        if (!text.IsEmpty()) {
            pDC->SelectStockObject(BLACK_PEN);
            pDC->SelectStockObject(NULL_BRUSH);
            pDC->Rectangle(pButton->GetRect());
        }
    }

Using Paint.NET to make us a new “Exit icon”

Screenshot_75

The Windows 10 menu is also a little wider (520 pixels overall)

Screenshot_77

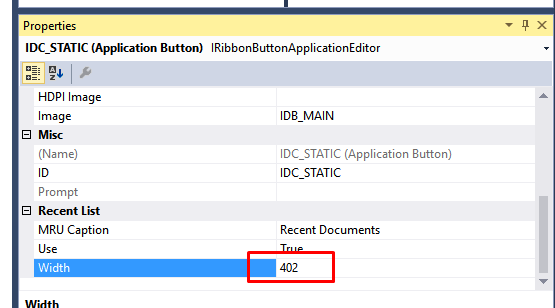
The demo only makes the ribbon panel 300, in the designer click on the Icon, and in the properties change the width to be ~400, The LHS is approximately 118 pixels wide, so the value of the Recent List needs to be ~520-118 to get the same size

ideally we’d make the LHS wider.

It was only later as I looked back at the MFC code I realized that the width of the LHS is dependent on the contents, if in our example the LHS contained the same longer description, “Change folder and search option” then the pane would be larger.

Image22

This means that really you need to be careful with your width setting, the 300 used by default is likely ample, giving our application  the same Windows 10 sizing
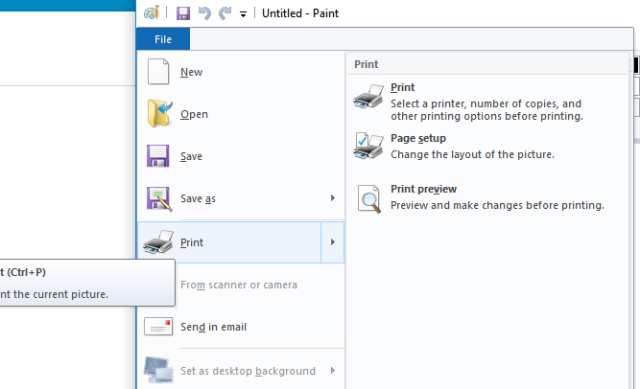
Image25

Menu Selection

The menu selection in Windows 10 is also a little different

Screenshot_78

This is also true for the QuickAccessToolBar

Screenshot_79

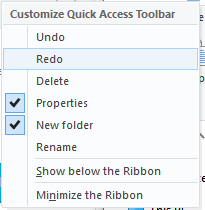
And this is not the case for our example application

Screenshot_81

Overriding GetMenuItemTextColor we can see how the menu gets its colors for the text

Screenshot_84

virtual COLORREF GetMenuItemTextColor(
        CMFCToolBarMenuButton* pButton,
        BOOL bHighlighted,
        BOOL bDisabled)
    {
        static_cast(pButton);
        static_cast(bHighlighted);
        static_cast(bDisabled);
        return RGB(0x00, 0xFF, 0x00);
    }

and overriding  OnHighlightMenuItem we can see clearly that this controls the highlighted menu items

virtual void OnHighlightMenuItem(
        CDC* pDC,
        CMFCToolBarMenuButton* pButton,
        CRect rect,
        COLORREF& clrText) override
    {
        static_cast(pButton);
 
        pDC->FillSolidRect(rect, RGB(0xFF, 0, 0));
        clrText = RGB(0x00, 0x00, 0xFF);
    }

Screenshot_85

So for the Windows 10 look we make the following changes

virtual COLORREF GetMenuItemTextColor(
    CMFCToolBarMenuButton* pButton,
    BOOL bHighlighted,
    BOOL bDisabled) override
{
    static_cast(pButton);
    static_cast(bHighlighted);
    static_cast(bDisabled);
    return GetSysColor(COLOR_MENUTEXT);
}
 
virtual void OnHighlightMenuItem(
    CDC* pDC,
    CMFCToolBarMenuButton* pButton,
    CRect rect,
    COLORREF& clrText) override
{
    static_cast(pButton);
 
    // #EDF4FC
    pDC->FillSolidRect(rect, RGB(0xED, 0xF4, 0xFC));
 
    // #A8D2FD
    CPen pen(PS_SOLID, 1, RGB(0xA8, 0xD2, 0xFD));
    pDC->SelectObject(pen);
    pDC->SelectStockObject(NULL_BRUSH);
    pDC->Rectangle(rect);
    clrText = GetSysColor(COLOR_MENUTEXT);
}

And to handle the check box we have to copy a bit of logic from the base class, and also add to our project a 16×16 image of the check box tick (use Paint.NET to make this a transparent PNG)

class CWindows10Style : public CMFCVisualManagerOffice2007
{
    DECLARE_DYNCREATE(CWindows10Style);
 
    CMFCToolBarImages m_uiElements;
.....

In the constructor of the CWindows10Style class we load the bitmap

CWindows10Style::CWindows10Style()
{
    m_crlBkgn = RGB(0xFF, 30, 30);
 
    CMFCVisualManagerOffice2007::SetStyle(CMFCVisualManagerOffice2007::Office2007_Silver);
 
    m_tabFaceBrush.CreateSolidBrush(m_clrWindows10ApplicationButton);
    m_tabBlackBrush.CreateSolidBrush(GetSysColor(COLOR_WINDOWFRAME));
 
    // load the UI elements
    m_uiElements.Load(IDB_UI_ELEMENTS);
}

Then in the OnDrawMenuCheck we now utilize the colors and draw the check box

virtual void OnDrawMenuCheck(
        CDC* pDC,
        CMFCToolBarMenuButton* pButton,
        CRect rect,
        BOOL bHighlight,
        BOOL bIsRadio)
    {
        static_cast(pButton);
        static_cast(bHighlight);
        static_cast(bIsRadio);
 
        rect.InflateRect(0, 1);
 
        if (bHighlight)
        {
            // #C2DEFC
            pDC->SelectStockObject(NULL_PEN);
            pDC->FillSolidRect(rect, RGB(0xC2, 0xDE, 0xFC));
 
            // #5FA2E6
            CPen pen(PS_SOLID, 1, RGB(0x5F, 0xA2, 0xE6));
            pDC->SelectObject(pen);
            pDC->SelectStockObject(NULL_BRUSH);
            pDC->Rectangle(rect);
        }
        else {
            // #CEE5FC
            pDC->SelectStockObject(NULL_PEN);
            pDC->FillSolidRect(rect, RGB(0xCE, 0xE5, 0xFC));
 
            // #64A5E6
            CPen pen(PS_SOLID, 1, RGB(0x64, 0xA5, 0xE6));
            pDC->SelectObject(pen);
            pDC->SelectStockObject(NULL_BRUSH);
            pDC->Rectangle(rect);
        }
 
        CSize size(m_uiElements.GetImageSize());
        CRect imgRect(0, 0, size.cx, size.cy);
 
        if ((pButton->m_nStyle & TBBS_DISABLED) == TBBS_DISABLED)
        {
            imgRect.OffsetRect(0, size.cy);
        }
 
        m_uiElements.DrawEx(pDC, rect, 0,CMFCToolBarImages::ImageAlignHorzCenter,
            CMFCToolBarImages::ImageAlignVertCenter, imgRect);
    }

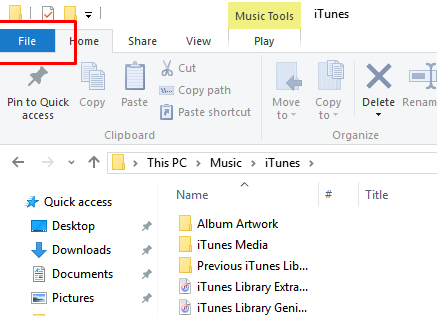
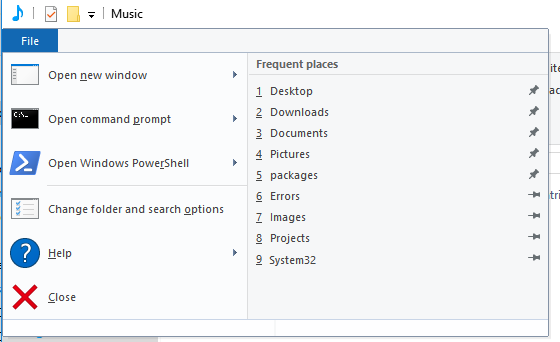
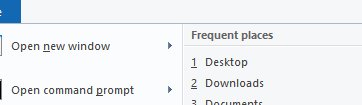
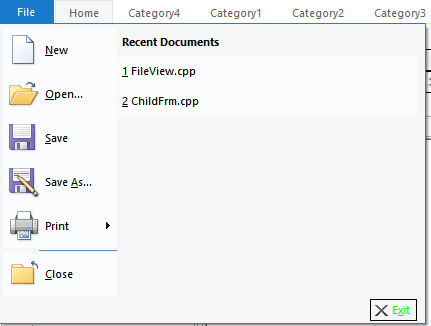
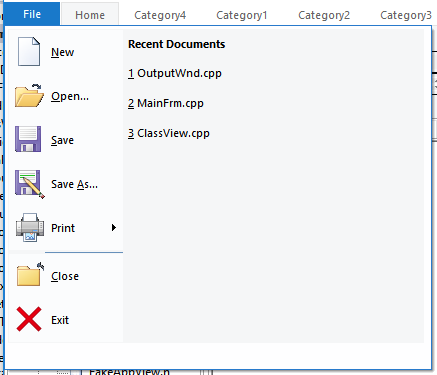
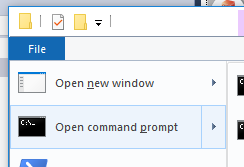
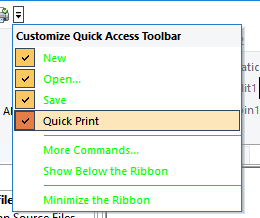
The result is a Windows 10 style Quick Access menu that looks closer to that of the Windows 10 file explorer

Screenshot_86

Screenshot_79

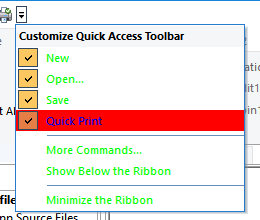
However the menu selection is done differently in the menu,

Screenshot_80

but by changing the OnFillRibbonButton call we can add the selection highlight

virtual COLORREF OnFillRibbonButton(
        CDC* pDC,
        CMFCRibbonButton* pButton)
    {
        if (pButton->GetParentPanel() && pButton->GetParentPanel()->IsKindOf(RUNTIME_CLASS(CMFCRibbonMainPanel)))
        {
            // RHS of recent files does not have large icons
            if (pButton->IsLargeImage()) {
                if (pButton->IsHighlighted()) {
                    // #EDF4FC
                    pDC->FillSolidRect(pButton->GetRect(), RGB(0xED, 0xF4, 0xFC));
 
                    // #A8D2FD
                    CPen pen(PS_SOLID, 1, RGB(0xA8, 0xD2, 0xFD));
                    pDC->SelectObject(pen);
                    pDC->SelectStockObject(NULL_BRUSH);
                    pDC->Rectangle(pButton->GetRect());
                }
                else {
                    pDC->FillSolidRect(pButton->GetRect(), RGB(0xFB, 0xFC, 0xFD));
                }
                return GetSysColor(COLOR_WINDOWTEXT);
            }
        }
        return GetSysColor(COLOR_WINDOWTEXT);
    }

Screenshot_87

Which in turn, highlights some minor differences in the submenu on the RHS

Screenshot_82

Tab Label

A minor bug in our earlier OnDrawTab function means we were using GetWindowText to get the tab label, this lead to some tab controls not drawing correctly

Image8

This was altered to use the GetTabLabel call

CString str;
pTabWnd->GetTabLabel(iTab, str);

The examples used in these experiments are available online

https://github.com/mydeveloperday/ribbonexamples

Posted in C++, Development, MFC, Programming | Tagged , , , | 4 Comments

MFC 25th Birthday Makeover (Part 3)

In this 3rd installment as we try to make our example application look more “Windows 10”, we start with our application with still too much blue

Screenshot_38

Lets start by trying to remove the blue from the tabs,

virtual void OnDrawTab(
        CDC* pDC,
        CRect rectTab,
        int iTab,
        BOOL bIsActive,
        const CMFCBaseTabCtrl* pTabWnd)
    {
        CBrush brush(GetSysColor(COLOR_WINDOWTEXT));
        pDC->FillRect(rectTab, &brush);
    }

Adding the following function with the color set to COLOR_WINDOWTEXT (black) will show us where this function  will draw

This inserts back boxes for the tabs

Screenshot_39

But the background remains blue, to colorize the tab background you must override the OnEraseTabsArea call

virtual void OnEraseTabsArea(
       CDC* pDC,
       CRect rect,
       const CMFCBaseTabCtrl* pTabWnd)
   {
       pDC->FillSolidRect(rect, RGB(0x0, 0xFF, 0));
   }

Screenshot_40

We have also altered the tab OnDrawTab function to show the active and inactive tabs in a different color..

virtual void OnDrawTab(
        CDC* pDC,
        CRect rectTab,
        int iTab,
        BOOL bIsActive,
        const CMFCBaseTabCtrl* pTabWnd)
    {
        if (bIsActive) {
            CBrush brush(GetSysColor(COLOR_WINDOWTEXT));
            pDC->FillRect(rectTab, &brush);
        }
        else {
            CBrush brush(GetSysColor(COLOR_BTNSHADOW));
            pDC->FillRect(rectTab, &brush);
        }
    }

Its not totally obvious what color the tabs should be, however lets assume they are the same coloring as the ribbon tabs. By changing the call OnDrawTab to handle the tab text and adding the lines between the tabs.

virtual void OnDrawTab(
        CDC* pDC,
        CRect rectTab,
        int iTab,
        BOOL bIsActive,
        const CMFCBaseTabCtrl* pTabWnd)
    {
        if (bIsActive) {
            CBrush brush(GetSysColor(COLOR_INACTIVEBORDER));
            pDC->FillRect(rectTab, &brush);
        }
        else {
            pDC->FillSolidRect(rectTab, GetSysColor(COLOR_WINDOW));
        }
 
        CWnd *pTabWndCtrl = pTabWnd->GetTabWnd(iTab);
 
        CPen pen(PS_SOLID, 1, GetSysColor(COLOR_3DLIGHT));
        pDC->SelectObject(pen);
 
        if (pTabWnd->GetLocation() == CMFCBaseTabCtrl::LOCATION_BOTTOM)
        {
            pDC->MoveTo(CPoint(rectTab.left, rectTab.bottom));
            pDC->LineTo(CPoint(rectTab.right - 1, rectTab.bottom));
        }
        else {
            pDC->MoveTo(CPoint(rectTab.left, rectTab.top));
            pDC->LineTo(CPoint(rectTab.right - 1, rectTab.top));
        }
 
        // the right hand side of the tab
        pDC->MoveTo(CPoint(rectTab.right - 1, rectTab.top));
        pDC->LineTo(CPoint(rectTab.right - 1, rectTab.bottom));
 
 
        CString str;
        pTabWndCtrl->GetWindowTextW(str);
 
        if (!str.IsEmpty())
        {
            rectTab.DeflateRect(1, 1);
 
            if ((rectTab.Width() % 2) == 0)
            {
                rectTab.right--;
            }
 
            rectTab.OffsetRect(0, -1);
 
            COLORREF clrTextOld = pDC->SetTextColor(GetSysColor(COLOR_WINDOWFRAME));
            pDC->DrawText(str, rectTab, DT_SINGLELINE | DT_CENTER | DT_VCENTER | DT_END_ELLIPSIS | DT_NOPREFIX);
            pDC->SetTextColor(clrTextOld);
        }
    }

This alters the appearance to remove the blue background.

Screenshot_41

Lets bring some of the other dock panels from the example application, these have other visual elements that still show the default “blue” coloring.

Screenshot_42

Lets now try and eliminate those.

The group color text can be override by implementing the GetPropertyGridGroupColor virtual function on the VisualManager class

virtual COLORREF GetPropertyGridGroupColor(CMFCPropertyGridCtrl* pPropList)
{
        return GetSysColor(COLOR_INACTIVEBORDER);
}

However this only solves a small part, and leave the main description area blue

Screenshot_43

In order to change that color we have to look a little deeper into what MFC is doing, because the drawing of that is outside of the VisualManager overrides

This is actually handled by the information stored in GetGlobalData(), I don’t really want to dive into the complete working of  AFX_GLOBAL_DATA other than to say that it stores some global data which is used by the MFC framework in some of the drawing routines

https://msdn.microsoft.com/en-us/library/bb984192.aspx?f=255&MSPPError=-2147217396

In our case the text description area of the property grid is controlled by the brBarFace value, which is a brush.

The VisualManager function calls an override OnUpdateSystemColors() when there is a request to change the visual manager, this is your opportunity to change the global data

GSnippet
void OnUpdateSystemColors() override
{
    GetGlobalData()->brBarFace.DeleteObject();
    GetGlobalData()->brBarFace.CreateSolidBrush(GetSysColor(COLOR_INACTIVEBORDER));
}

You must delete the object first to free up the brush before reallocating

Screenshot_44

This changes the description area but not the border, one way to bring the look and feel closer to the OS is to override all the system colors with the GetSysColor versions

This has the effect of bringing all the parts of MFC where they use the global data to be using the colors as defined by the system

void OnUpdateSystemColors() override
    {
        GetGlobalData()->clrBarFace = ::GetSysColor(COLOR_BTNFACE);
        GetGlobalData()->clrBtnFace = ::GetSysColor(COLOR_BTNFACE);
 
        GetGlobalData()->clrBarShadow = ::GetSysColor(COLOR_BTNSHADOW);
        GetGlobalData()->clrBtnShadow = ::GetSysColor(COLOR_BTNSHADOW);
 
        GetGlobalData()->clrBarDkShadow = ::GetSysColor(COLOR_3DDKSHADOW);
        GetGlobalData()->clrBtnDkShadow = ::GetSysColor(COLOR_3DDKSHADOW);
 
        GetGlobalData()->clrBarLight = ::GetSysColor(COLOR_3DLIGHT);
        GetGlobalData()->clrBtnLight = ::GetSysColor(COLOR_3DLIGHT);
 
        GetGlobalData()->clrBarHilite = ::GetSysColor(COLOR_BTNHIGHLIGHT);
        GetGlobalData()->clrBtnHilite = ::GetSysColor(COLOR_BTNHIGHLIGHT);
 
        GetGlobalData()->clrBarText = ::GetSysColor(COLOR_BTNTEXT);
        GetGlobalData()->clrBtnText = ::GetSysColor(COLOR_BTNTEXT);
        GetGlobalData()->clrGrayedText = ::GetSysColor(COLOR_GRAYTEXT);
        GetGlobalData()->clrWindowFrame = ::GetSysColor(COLOR_WINDOWFRAME);
 
        GetGlobalData()->clrHilite = ::GetSysColor(COLOR_HIGHLIGHT);
        GetGlobalData()->clrTextHilite = ::GetSysColor(COLOR_HIGHLIGHTTEXT);
 
        GetGlobalData()->clrBarWindow = ::GetSysColor(COLOR_WINDOW);
        GetGlobalData()->clrWindow = ::GetSysColor(COLOR_WINDOW);
 
        GetGlobalData()->clrWindowText = ::GetSysColor(COLOR_WINDOWTEXT);
 
        GetGlobalData()->clrCaptionText = ::GetSysColor(COLOR_CAPTIONTEXT);
        GetGlobalData()->clrMenuText = ::GetSysColor(COLOR_MENUTEXT);
 
        GetGlobalData()->clrActiveCaption = ::GetSysColor(COLOR_ACTIVECAPTION);
        GetGlobalData()->clrInactiveCaption = ::GetSysColor(COLOR_INACTIVECAPTION);
 
        GetGlobalData()->clrActiveCaptionGradient = ::GetSysColor(COLOR_GRADIENTACTIVECAPTION);
        GetGlobalData()->clrInactiveCaptionGradient = ::GetSysColor(COLOR_GRADIENTINACTIVECAPTION);
 
        GetGlobalData()->clrActiveBorder = ::GetSysColor(COLOR_ACTIVEBORDER);
        GetGlobalData()->clrInactiveBorder = ::GetSysColor(COLOR_INACTIVEBORDER);
 
        GetGlobalData()->clrInactiveCaptionText = ::GetSysColor(COLOR_INACTIVECAPTIONTEXT);
        
        GetGlobalData()->brBtnFace.DeleteObject();
        GetGlobalData()->brBtnFace.CreateSolidBrush(GetGlobalData()->clrBtnFace);
 
        GetGlobalData()->brBarFace.DeleteObject();
        GetGlobalData()->brBarFace.CreateSolidBrush(GetGlobalData()->clrBarFace);
 
        GetGlobalData()->brActiveCaption.DeleteObject();
        GetGlobalData()->brActiveCaption.CreateSolidBrush(GetGlobalData()->clrActiveCaption);
 
        GetGlobalData()->brInactiveCaption.DeleteObject();
        GetGlobalData()->brInactiveCaption.CreateSolidBrush(GetGlobalData()->clrInactiveCaption);
 
        GetGlobalData()->brHilite.DeleteObject();
        GetGlobalData()->brHilite.CreateSolidBrush(GetGlobalData()->clrHilite);
 
        GetGlobalData()->brBlack.DeleteObject();
        GetGlobalData()->brBlack.CreateSolidBrush(GetGlobalData()->clrBtnDkShadow);
 
        GetGlobalData()->brWindow.DeleteObject();
        GetGlobalData()->brWindow.CreateSolidBrush(GetGlobalData()->clrWindow);
 
        GetGlobalData()->penHilite.DeleteObject();
        GetGlobalData()->penHilite.CreatePen(PS_SOLID, 1, afxGlobalData.clrHilite);
 
        GetGlobalData()->penBarFace.DeleteObject();
        GetGlobalData()->penBarFace.CreatePen(PS_SOLID, 1, afxGlobalData.clrBarFace);
 
        GetGlobalData()->penBarShadow.DeleteObject();
        GetGlobalData()->penBarShadow.CreatePen(PS_SOLID, 1, afxGlobalData.clrBarShadow);
    }

Using the system colors helps keep the colors correct when the user switches to a high contrast theme

Screenshot_45

This lets us see where we made the wrong assumption on colors at the beginning

Image4

However for now the Application is closer to our desired Windows 10 look, in the  next post we’ll discuss some of the small bugs and graphical glitches

Screenshot_46.png

The examples used in these experiments are available online

https://github.com/mydeveloperday/ribbonexamples

Posted in C++, Development, MFC | Tagged , , | Leave a comment

MFC 25th Birthday Makeover (Part 2)

Following on from part 1  our aim is to understand the effects of the VisualManager API in order our make an application look like its native to Windows 10

screenshot_25

Our example example application, had a poorly quality main button, in Windows 10 Explorer this is normally just a file menu button.

screenshot_28

Lets start by getting rid of the circular button, This is handled by the OnDrawRibbonApplicationButton call

virtual void OnDrawRibbonApplicationButton(
        CDC* pDC,
        CMFCRibbonButton* pButton)
    {
        CBrush brush(GetSysColor(COLOR_HOTLIGHT));
        pDC->FillRect(pButton->GetRect(), &brush);
    }

screenshot_29

This only changes the back ground of the button

This is because inside MFC’s void CMFCRibbonBar::OnPaint() it performs this in 2 steps

....
VisualManager::GetInstance()->OnDrawRibbonApplicationButton(pDC, m_pMainButton);
m_pMainButton->OnDraw(pDC);
...

The CMFCRibbonApplicationButton is responsbile for drawing itself

CMFCRibbonApplicationButton*  m_pMainButton;

if we overload the CMFCRibbonApplicationButton and set an instance of that button onto the RibbonBar object

CSize buttonSize(56, 45);
m_wndRibbonBar.SetApplicationButton(&m_MainButton,buttonSize);
class CWindows10StyleApplicationButton: public CMFCRibbonApplicationButton
{
public:
    CWindows10StyleApplicationButton() {
         SetText(L"File");
    } 
    void OnDraw(CDC* pDC) {         
         CString str = GetText();         
         if (!str.IsEmpty()) {
             COLORREF clrTextOld = 
              pDC->SetTextColor(GetSysColor(COLOR_HIGHLIGHTTEXT));             
              pDC->DrawText(str, GetRect(), DT_SINGLELINE | DT_CENTER | 
                    DT_VCENTER | DT_END_ELLIPSIS | DT_NOPREFIX);             
              pDC->SetTextColor(clrTextOld);         
          }     
    }
};

Our application can take on the windows 10 File menu style

screenshot_30

The next are of attach is at the bottom of the application, the StatusBar

screenshot_31

The status bar still has the original coloring.

Sometimes its hard to tell which parts the API is going to color, so this is why its useful to sometimes color them boldly so you can clearly see what will get colored with what

screenshot_33

In this example we are using the OnDrawRibbonStatusBarPane call

virtual COLORREF OnDrawRibbonStatusBarPane(
        CDC* pDC,
        CMFCRibbonStatusBar* pBar,
        CMFCRibbonStatusBarPane* pPane)
    {
        // this is the color of the names
        CBrush brush(GetSysColor(COLOR_BTNTEXT));
        pDC->FillRect(pPane->GetRect(), &brush);
 
        // this is the text color
        return GetSysColor(COLOR_WINDOW);
    }

You can see that its the actual panes that are being drawn not the whole bar, The main StatusBar (and possibly other bars like menubar and toolbar) are handled via the OnFillBarBackground call

In this case we simply fill the rectange with the whitebackground that windows 10 uses

virtual void OnFillBarBackground(
    CDC* pDC,
    CBasePane* pBar,
    CRect rectClient,
    CRect rectClip,
    BOOL bNCArea = FALSE)
{
    CBrush brush(GetSysColor(COLOR_WINDOW));
    pDC->FillRect(rectClient, &brush);
}

Having performed this and adjusting the OnDrawRibbonStatusBarPane to draw with similar colors our application looks like this.

screenshot_34

Making more progress towards our windows 10 look and feel.

So you may have noticed the “sizing box” on the statusbar, windows 10 tends not to show this, however Microsoft is inconsistent here with their apps

screenshot_35

Both MSPaint and Explorer use both subtle different colors for their status bar but also one has a sizing box the other does not

Should you not want to show a sizing box, you can draw it yourself via OnDrawStatusBarSizeBox. (shown with COLOR_WINDOWTEXT)

screenshot_36

virtual void OnDrawStatusBarSizeBox(
        CDC* pDC,
        CMFCStatusBar* pStatBar,
        CRect rectSizeBox)
    {
        CBrush brush(GetSysColor(COLOR_WINDOW));
        pDC->FillRect(rectSizeBox, &brush);
    }

The application now looks closer to what we are looking for:

screenshot_37

In the next post we’ll cover how to remove the remainder of the blue backgrounds.

MyDeveloperDay

Posted in C++, Development, MFC | Tagged , , | Leave a comment

MFC 25th Birthday Makeover (Part 1)

With MFC (Microsoft Foundation Classes) reaching the ripe old age of 25 many C++ developer find themselves still using it for Windows desktop application development,
Why is this when Microsoft has introduced new UI concepts like WPF/XAML/WinForms?

Well it may have something to do with the fact that MFC is still the only C++ UI Framework provided by Microsoft that has many of the key UI elements that are needed for Windows Desktop application (Ribbons,MDI, ToolBar,Menu,Dialogs).

For those developing in C++ to use the newer UI technologies they have to jump over a language barrier to use them (C++/C#, C++/Manage C++). The Whole managed/unmanaged story add a layer of marshaling and nastiness that makes debugging and code reuse painful.

Continue reading

Posted in C++, Development, MFC, Programming | Tagged , | 1 Comment

Making a C++ .NET Framework (Part 3)

Taking cpp-net-framework open source..

One of the key goals of cpp-net-framework is for it to be cross platform, having the .net framework power on other OS types would allow tools that were originally written to work in windows in c# to be used on Linux and Mac OSX

So from the start I need to ensure that the code I am building works on those platforms even if i don’t have direct access to those machine types. having the code from these blogs available to the people reading it is important to me but I also had a desire to learn more about what it can mean to deliver an open source solution.

Continue reading

Posted in Uncategorized | Leave a comment

Making a C++ .NET Framework (Part 2)

In my last blog I talked about how having a .NET Framework readily available to C++ would allow developers to write tools with the same level of ease as using C#. I presented the obvious first example of a “HelloWorld” to demonstrate this capability, but of course this is a trivial example.

So now lets take this further, and do something with a little more meat. I don’t want to underestimate the enormity of this effort but to begin with let us start small and see what we can build.

Last time I exampled that I tend to only really use a subset of C# Framework capabilities, if I was going to list my most used it would be:

Continue reading

Posted in .NET Framework, C++, Development, Programming | Tagged , , | Leave a comment

Making a C++ .NET Framework (Part 1)

Most of my day is spent developing in C++, I love C++ , but out of the box C++ is pretty hard for new starters, its not that the language is anymore complex than C# or Java or other languages it just its missing the ability to build an application quickly, well that is until you’ve built some supporting libraries, STL gets you started but fundamentally we are missing out of the box capabilities for performing simple operations, e.g. downloading a web page, regular expressions, XML, JSON  parsing, dare I even say Images, UI

Sure you can download libraries like Xerxes, curl and GNU regexp code and hook them in, but you don’t get a consistent interface that is simple to use..its all abit messy,

So when I want to throw together a little app, maybe that interacts with the continuous integration system, or scans code, then I find myself turning to C# to perform those actions

Continue reading

Posted in C++, Development, Programming, Uncategorized | Tagged , | Leave a comment

Is Modern C++ The Emperor’s new Clothes

You hear a lot about “modern C++” these days and how you are supposed to use all the new fancy features of C++11/C++14, “because they are beautiful”, “clearer”, “less error prone”

Yes they are great, but I seem to continuously find myself pushing back against their use because..well in my view they are a bit ugly…there I said it.. the emperor has no clothes on!!

Continue reading

Posted in C++, Development, Programming, Uncategorized | Tagged , | Leave a comment

Contributing to Clang-Format

The following blog outlines my experiences when starting to try and get involved in the clang open source project, your own experiences may be different (your mileage may vary!), but I wrote this to document how I approached it,because despite some good guidelines its still pretty hard to jump into such a big project. What I say here may not be the official way,  But this is what I did…

Following my previous blog post about clang-format I realized that the functionality i need for the bracebreak before an else isn’t part of clang-format

Having found a  contribution that covered what I needed from clang-format on the web, I wondered why it was not part of core clang-format, being keen on having this functionality, I felt perhaps what i should do is try and get this contributed or at least find out why it was not.

Keen to not get a “Patches Welcome” response, I decided the best thing I could do is to follow the process and just see how easy is it to take part.

Continue reading

Posted in C++, Clang-Format, Development, Uncategorized | Tagged | Leave a comment

Formatting C++ with Clang-Format

Over the years, I’ve spent developing code I have tried lots of different tools to help me format the way my code looks.

I tend to find unless my editing environment is set up correctly its easy for me to  inadvertently add too many spaces and on some occasions tabs, and even when the IDE is setup correctly I still find that I add spaces at the end of lines or certain amount of adding and deleting lines leads to extraneous white spaces in the code I am editing.

If your working on a large shared code based which is being editing by a number of developers at the same time you can often find over time the style of the file drifts away from a common style, code merging and different developers style all help to make the file inconsistent.

There have been tools to format a common style for years,  for example “indent” and “astyle” to name a few, but generally these files will do what you need but sometimes they are limited on the customization or how you can run them. Often they support a standard style but it doesn’t quite match what you want.

These tools are often command line based and yet many developers either work inside an IDE like visual studio or even develop both in command line tools and IDE interchangeably.

Continue reading

Posted in C++, Clang-Format, Development, Programming | Tagged , , , | 1 Comment